Bài viết này dựa trên một số nguồn :
-
Flavor là gì ?
- Trong quá trình phát triển app. Chúng ta các cần cài đặt các môi trường khác nhau, dùng cho các mục đích cụ thể trong từng giai đoạn phát triển app. Thông thường các app được chia thành các môi trường như : develop, staging, production.
- Flavor là khái niệm trong flutter hỗ trợ bạn làm việc này. Bài viết này chúng ta cùng nhau đi tìm hiểu cách sử dụng flavor.
- Chuẩn bị.
- Chúng ta cần chuẩn bị trước một số thứ :
- XCode
- Tạo sẵn Project Flutter. Ở đây mình tạo sẵn project có tên là
Flutter_Origin - Ở bài viết này chúng ta sẽ tạo ra 3 môi trường : dev (develop), stg (staging), prod (production)
- Chúng ta cần chuẩn bị trước một số thứ :
-
Tạo các mode build
-
Bước 1 : Tạo các file
main.dartcho từng môi trường :main_dev.dart,main_stg.dart,main_prod.dart
-
Chúng ta truyền title, để nhận biết môi trường. (
titlenày là biến mình tạo ra để truyền vào)class OriginApp extends StatelessWidget { final String? title; const OriginApp({super.key, this.title}); }void main() { runApp(const OriginApp(title: " DEV Flutter Origin")); }void main() { runApp(const OriginApp(title: " PROD Flutter Origin")); }void main() { runApp(const OriginApp(title: " STG Flutter Origin")); } -
Bước 2 : Tạo file
launch.json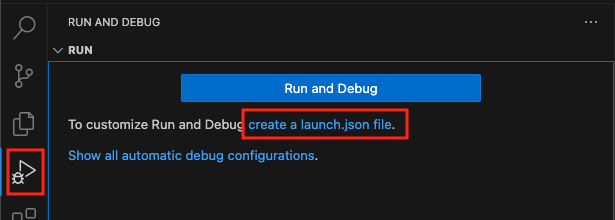
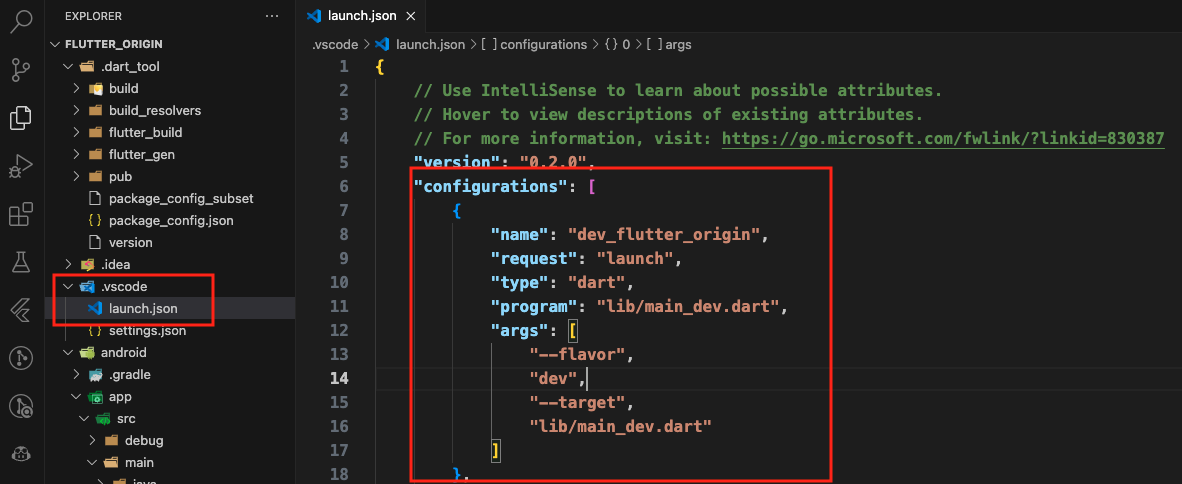
-
Bổ sung nội dung cho file
launch.jsonnhư dưới đây :{ // Use IntelliSense to learn about possible attributes. // Hover to view descriptions of existing attributes. // For more information, visit: https://go.microsoft.com/fwlink/?linkid=830387 "version": "0.2.0", "configurations": [ { "name": "dev_flutter_origin", "request": "launch", "type": "dart", "program": "lib/main_dev.dart", "args": [ "--flavor", "dev", "--target", "lib/main_dev.dart" ] }, { "name": "stg_flutter_origin", "request": "launch", "type": "dart", "program": "lib/main_stg.dart", "args": [ "--flavor", "stg", "--target", "lib/main_stg.dart" ] }, { "name": "prod_flutter_origin", "request": "launch", "type": "dart", "program": "lib/main_prod.dart", "args": [ "--flavor", "prod", "--target", "lib/main_prod.dart" ] }, ] } -
Bây giờ, bạn có thể thấy danh sách các mode build khi thực hiện debug
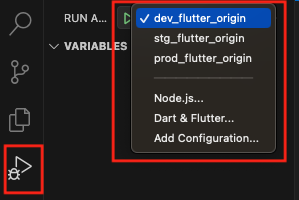
-
Thử chạy app với mode
dev_flutter_orginlên thử :Exception: The Xcode project does not define custom schemes. You cannot use the --flavor option.- Nó báo lỗi này khi bạn chạy trên máy ảo iOS. Đây là lỗi chúng ta chưa thức hiện các bước cấu hình cho từng platform nên flavor không hiểu.
-
-
Cấu hình trên Android
-
Mở file
android/app/src/build/gradle. Thực hiện bổ sung cấu hình như dưới đây :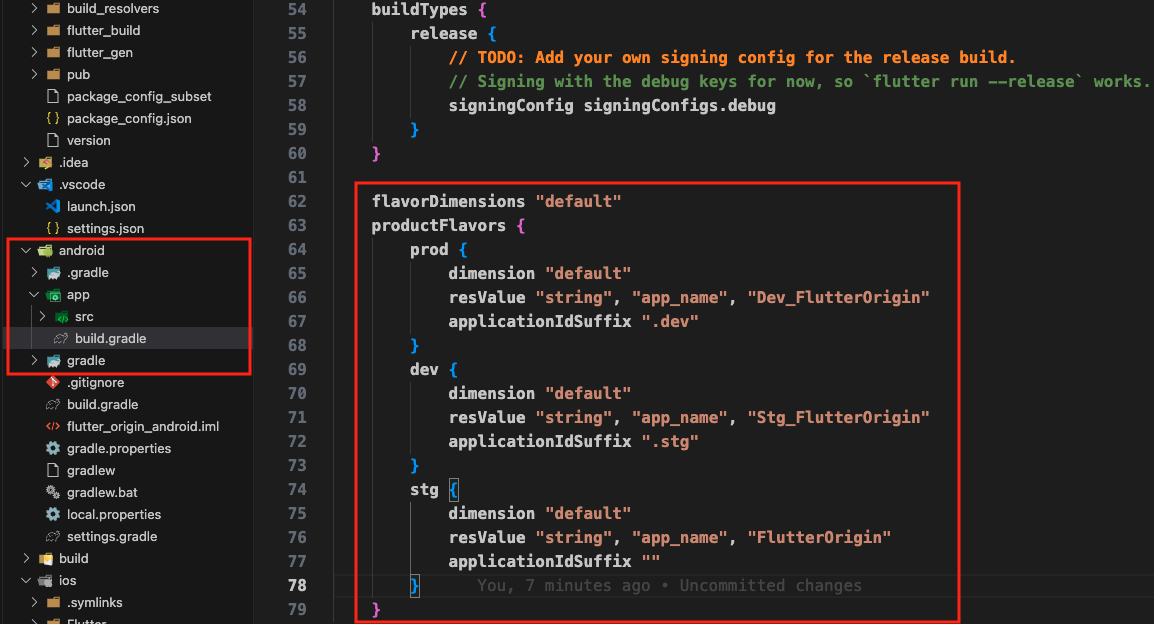
resValue: Xác định tên app- Nó sẽ tạo ra một giá trị kiểu string với key là app_name trong folder resources.
applicationIdSuffix: PackageId sẽ được xác định bởi hai giá trị kết hợp làapplicationId+applicationIdSuffix- Cập nhật lại file
AndroidMainfeshđể nhận được tên app cho từng môi trường.android:label="flutter_origin"=>android:label="@string/app_name"
-
-
Cấu hình iOS
-
Thực hiện mở file bên dưới bằng XCode
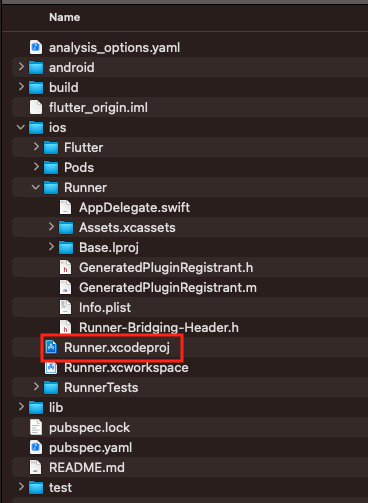
-
Thực hiện thêm các scheme cho từng môi trường
-
Thực hiện mở
Manage Schemes...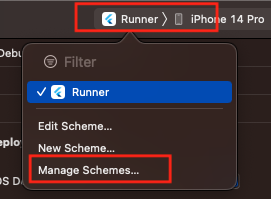
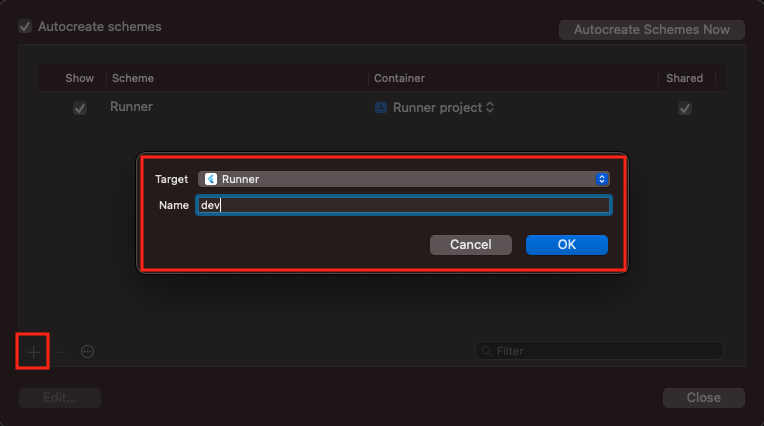
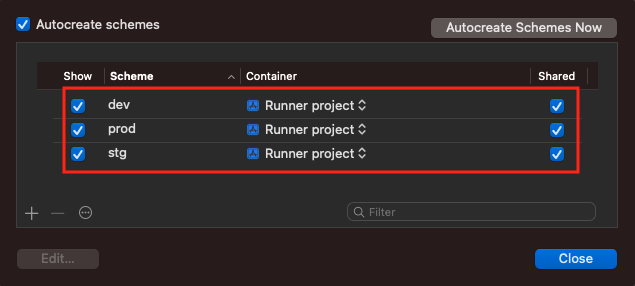
-
Thêm các Schemes cho các môi trường
-
Tại Project
Runner, mụcConfigurationstương ứng cho các môi trường (lưu ý : nênduplicatetừ các mode gốc)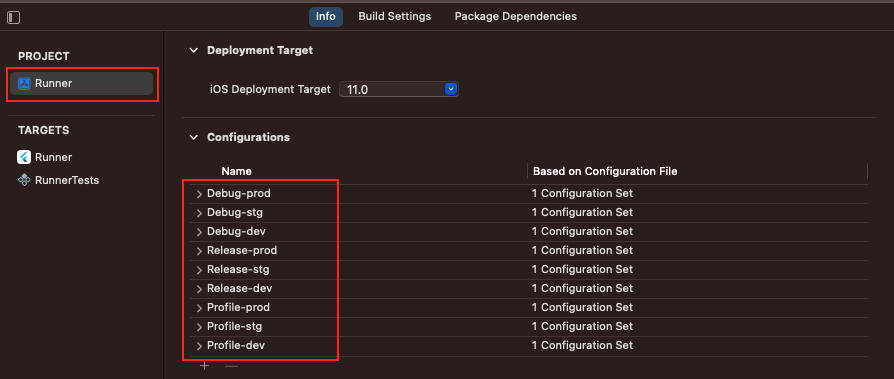
-
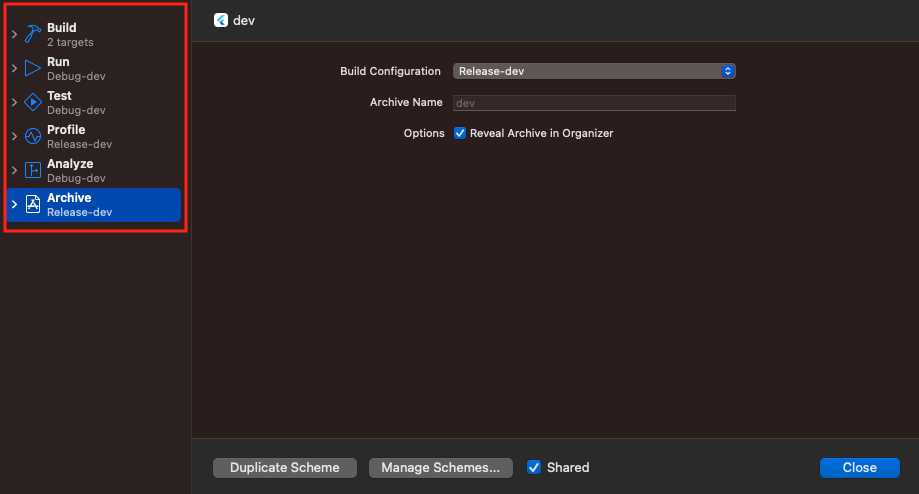
Thực hiện map
Schemesvào cácconfgurations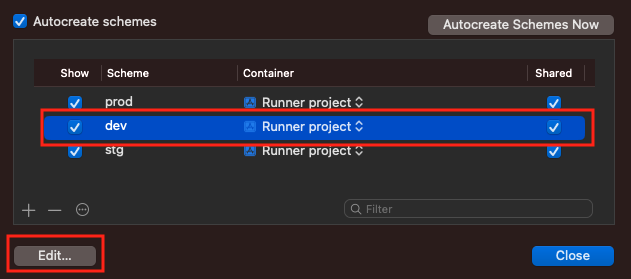

-
Tiếp theo, chúng ta cần xác định
Bundle Identifiercho từng môi trường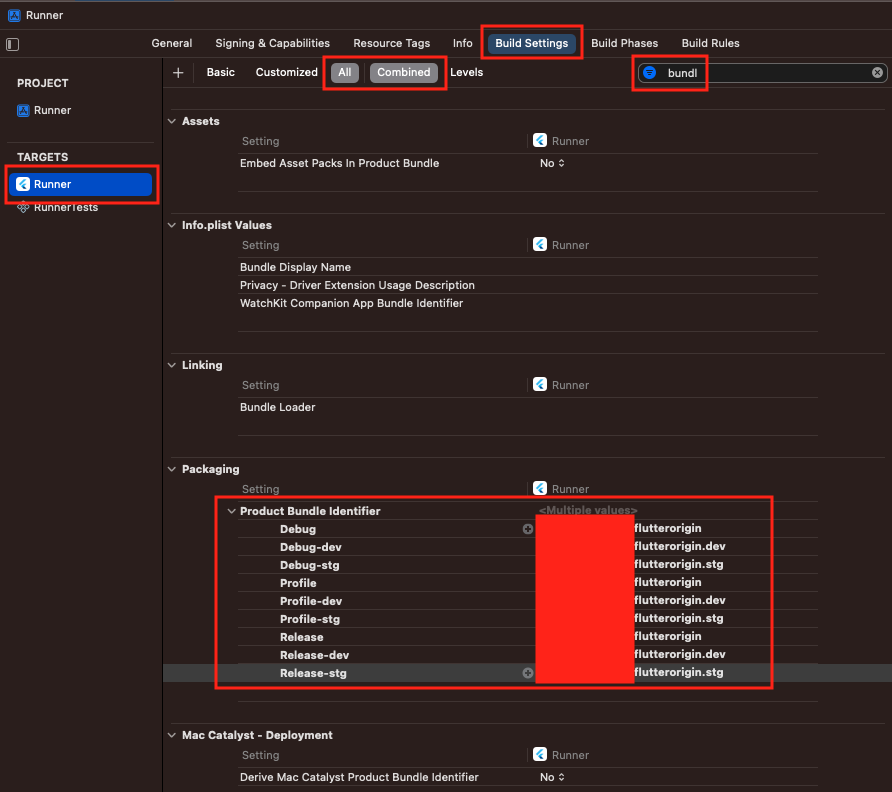
-
Tiếp theo, chúng ta cần xác định tên App cho từng môi trường. Bước này chúng ta cần tạo một key mới, ở đây mình đặt tên là
APP_DISPLAY_NAME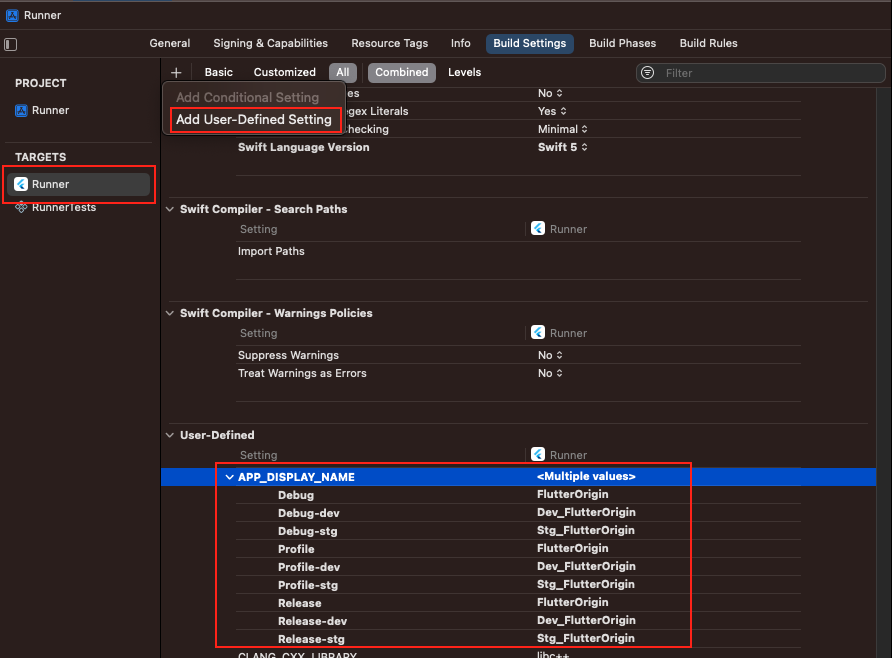
-
Cập nhật file
info.plist, cho keyBundle Display Namenhận một biến thay vì giá trị cố định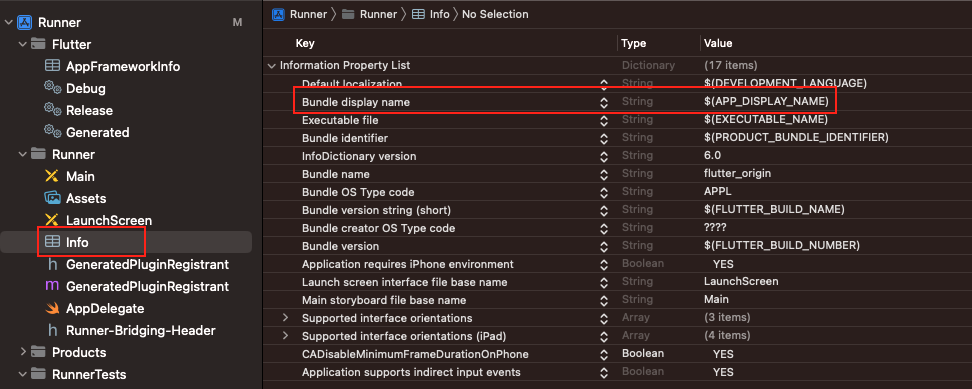
-
-
Các Bước config cở bản đã hoàn thành, bây giờ bạn có thể chạy app lên thử
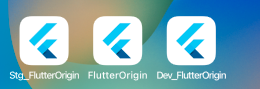
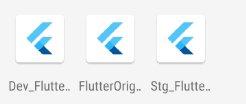
-
-
Truy cập môi trường.
- Phần này sẽ hướng dẫn chúng ta biết được app đang được chạy trên môi trường nào để xử lý logic tương ứng. Để làm được điều này chúng ta phải xử lý trên native một chút.
- Trên IOS :
-
Đầu tiên, chúng ta cần thêm một
UserDefineSettingđể lưu giá trị các môi trường, ở đây mình đặt tên nó làAPP_FLAVOR -
Tiếp theo, mở file
info.plistthêm một key mới, ở đây mình đặt tên làFlavor, nó sẽ nhận giá trị củaAPP_FLAVOR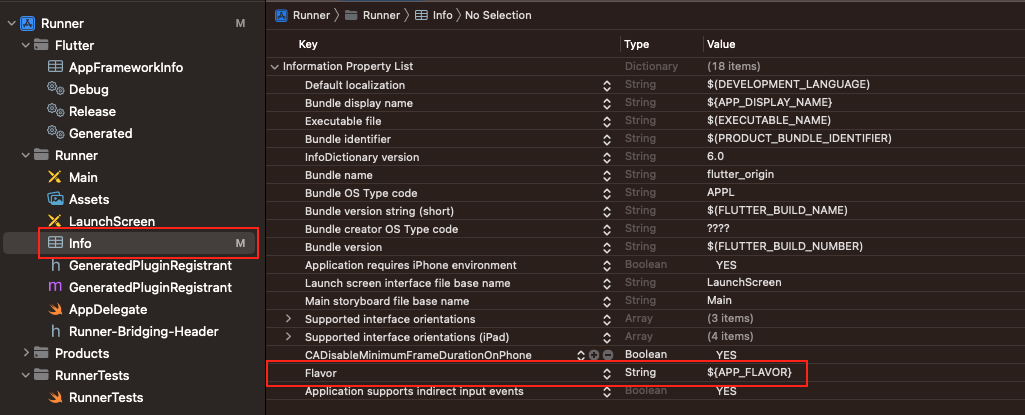
-
Tiếp theo, mở file
AppDelegate.swiftbằng XCode, thực hiệnorreridephương thứcdidFinishLaunchingWithOptionsimport UIKit import Flutter @UIApplicationMain @objc class AppDelegate: FlutterAppDelegate { override func application( _ application: UIApplication, didFinishLaunchingWithOptions launchOptions: [UIApplication.LaunchOptionsKey: Any]? ) -> Bool { let controller = window.rootViewController as! FlutterViewController let flavorChannel = FlutterMethodChannel( name: "flavor", binaryMessenger: controller.binaryMessenger) flavorChannel.setMethodCallHandler({(call: FlutterMethodCall, result: @escaping FlutterResult) -> Void in // Note: this method is invoked on the UI thread let flavor = Bundle.main.infoDictionary?["Flavor"] result(flavor) }) GeneratedPluginRegistrant.register(with: self) return super.application(application, didFinishLaunchingWithOptions: launchOptions) } } -
Lưu ý :
FlutterMethodChannelgiúp chúng ta gọi method từ nativename: "flavor": trong một app có thể có nhiềuFlutterMethodChannelchúng ta cần đặt tên cho nó.- Ở đoạn code trên hỗ trợ chúng ta lấy giá trị từ của
flavortrong fileinfo.plistbằng cách truy cậpBundle.main.infoDictionary[Flavor]
-
-
Trên Android, chúng tả mở file
MainActivity.ktvà thực hiệnFlutterMethodChanneltrên Androidpackage com.minhtamldt.flutterorigin.flutter_origin import androidx.annotation.NonNull import io.flutter.embedding.android.FlutterActivity import io.flutter.embedding.engine.FlutterEngine import io.flutter.plugin.common.MethodChannel import io.flutter.plugins.GeneratedPluginRegistrant class MainActivity: FlutterActivity() { override fun configureFlutterEngine(@NonNull flutterEngine: FlutterEngine) { GeneratedPluginRegistrant.registerWith(flutterEngine); MethodChannel(flutterEngine.dartExecutor.binaryMessenger, "flavor").setMethodCallHandler { call, result -> result.success(BuildConfig.FLAVOR) } } } -
Sau cùng trên code dart của flutter ta có thể truy cập giá trị biến môi trường bằng cách sau :
import 'package:flutter/services.dart';

enum FlavorType { dev, stg, prod }

class AppFlavor {
  static FlavorType? _type;
  static FlavorType get type => _type!;

  static Future<void> initAppFlavor() async {
    var channelMethod = 'flavor';
    var getFlavorMethod = 'getFlavor';

    String? flavor = await MethodChannel(channelMethod)
        .invokeMethod<String>(getFlavorMethod);

    switch (flavor) {
      case "dev":
        {
          _type = FlavorType.dev;
        }
      case "stg":
        {
          _type = FlavorType.stg;
        }
      default: //prod
        {
          _type = FlavorType.prod;
        }
    }
  }
}
import 'package:flutter/material.dart'; import 'package:flutter_origin/app.dart'; import 'package:flutter_origin/config/flavors/app_flavor.dart'; // flutter run --target lib/main.dart void main() async { // NOTE: This is required for accessing the method channel before runApp(). WidgetsFlutterBinding.ensureInitialized(); await AppFlavor.initAppFlavor(); runApp(const OriginApp()); } - Bạn thấy lúc này ta chỉ cần một file
main.dart, không cần phải tách ta các file main_{enviroment}.dart nữa
-
Tổng kết
- Phần này chúng ta đã có thể cấu hình các môi trường khác nhau trong flutter. Sẽ còn một số phần nâng cao, mình sẽ cập nhật trong thời gian tới
- Setting các icon
- Setting Firebase
- Setting DeepLink
- Phần này chúng ta đã có thể cấu hình các môi trường khác nhau trong flutter. Sẽ còn một số phần nâng cao, mình sẽ cập nhật trong thời gian tới