Nguồn : Setup development environments
- Flutter Command Arguments
- Trong phần cấu hình này, mình sẽ chỉ thiết lập thử 3 biến môi trường thường được sử dụng nhất.
- APP_NAME: Tên ứng dụng, cái giúp cho developers, testers,… dễ dàng nhận biết được ứng dụng đang sử dụng thuộc môi trường nào
- APP_SUFFIX: Hậu tố cho ApplicationID/BundleID cái cần thiết để có thể cài đặt cùng lúc các ứng dụng khác nhau trên cùng một thiết bị cũng như là cái được sử dụng để tích hợp vào các hệ thống khác như Firebase, AWS, hoặc SalesForce Marketing Cloud
- BASE_URL: Domain trỏ vào backend services
- Trong phần cấu hình này, mình sẽ chỉ thiết lập thử 3 biến môi trường thường được sử dụng nhất.
- Tạo lớp EnvironmentConfig
-
Lớp này các bạn có thể đặt trong file main.dart, hoặc có thể đặt trong file app.dart là file cấu hình cho toàn bộ ứng dụng giống như mình.
-
NOTE :
- Các biến môi trường phải
Const - Nên đặt thêm tiền tố
DART_DEFINES_
- Các biến môi trường phải
-
- Run/Build
-
Để thay đổi các biến môi trường này, chúng ta sẽ phải truyền chúng vào câu lệnh như những tham số giống bên dưới:
fvm flutter build appbundle --dart-define=DART_DEFINES_APP_NAME="SSM(Dev)" --dart-define=DART_DEFINES_APP_SUFFIX=.dev --debug -
Tương tự với việc run app :
fvm flutter run --dart-define=DART_DEFINES_APP_NAME="SSM(Dev)" --dart-define=DART_DEFINES_APP_SUFFIX=.dev --debug -
Nhìn câu lệnh trên thì các bạn cũng đoán ra đây là build Android App Bundle với các tham số truyền vào nhằm ghi đè(override) các biến toàn cục chúng ta đã thiết lập từ trước.
--dart-define=DART_DEFINES_APP_NAME="SSM(Dev)" --dart-define=DART_DEFINES_APP_SUFFIX=.dev -
Chúng ta đang thiết lập :
- Tên app là: SSM(Dev) với hậu tố (Dev)
- Ngoài ra hậu tố .dev là cần thiết cái giúp chúng ta tạo ra được các application id khác nhau để có thể cài đặt app trên cùng một thiết bị
-
- Cài đặt Firebase
- Trong Firebase Consolse của mình các bạn tạo 3 projects tương ứng với 3 môi trường(Develop/Staging/Production).
- Việc phân tách này là cần thiết. Tránh việc dữ liệu nào đó trong quá trình phát triển bị lẫn lộn, làm ảnh hưởng, sai lệch dữ liệu thật trên bản release(Production)
-
Có 3 buildtype được flutter thiết lập mặc định. Xem [chi tiết]([Flutter’s build modes Flutter](https://docs.flutter.dev/testing/build-modes)): debug,profile: Mode debug dùng để phân tích hiệu năng.release
- Cài đặt Android Project
- Chúng ta sẽ lấy các biến toàn cục đã được cấu hình ở phía Flutter và tích hợp vào các bản build tương ứng ở phía Android Native
- Parse Properties :
- Phân tách các thuộc tính(biến toàn cục) cái đã được thiết lập từ trước phía Flutter
- Rồi gán các giá trị này vào những nơi tương ứng (ApplicationID/BundleID) và Application Name
-
Để làm được việc này trong file android/app/build.gradle chúng ta thêm vào đoạn mã nguồn bên dưới:
def dartEnvironmentVariables = [ DART_DEFINES_APP_NAME: 'FFitYou', DART_DEFINES_APP_SUFFIX: null, DART_DEFINES_BASE_URL: 'https://dev.danhdue.com/', ] if (project.hasProperty('dart-defines')) { dartEnvironmentVariables = dartEnvironmentVariables + project.property('dart-defines') .split(',') .collectEntries { entry -> def pair = new String(entry.decodeBase64(), 'UTF-8').split('=') [(pair.first()): pair.last()] } } - Từ Flutter 2.2 trở đi, các giá trị này được Flutter compiler mã hoá bằng base64. Chính vì thế chúng ta có bước decodeBase64 cho string nhận được từ dart-define.
- Sau khi đã lấy được các biến toàn cục trên, chúng ta sẽ gán vào các vị trí tương ứng nhằm thay đổi applicationId và app_name
-
Trong phần defaultConfig của file android/app/build.gradle chúng ta thêm vào applicationIdSuffix và resValue dạng String với tên app_name như bên dưới
defaultConfig { applicationId "com.danhdue.stacked_state_mamagement" applicationIdSuffix dartEnvironmentVariables.DART_DEFINES_APP_SUFFIX minSdkVersion 19 targetSdkVersion 32 versionCode flutterVersionCode.toInteger() versionName flutterVersionName multiDexEnabled true resValue "string", "app_name", dartEnvironmentVariables.DART_DEFINES_APP_NAME } - Trong file android/app/src/main/AndroidManifest.xml chúng ta sửa tên của ứng dụng bằng cách thay: android:label=”stacked state management” bằng android:label=”@string/app_name”
- Setup build types :
-
Chúng ta sẽ cần thêm dòng sau và bên dưới defaultConfig nhằm chỉ rõ resources cho từng bản build của Android
flavorDimensions "app" -
Tiếp theo chúng ta cần cấu hình signingConfigs cho các build types và thêm nó vào các build types tương ứng :
signingConfigs { debug { storeFile file("../debug.keystore") storePassword 'android' keyAlias 'androiddebugkey' keyPassword 'android' } profile { storeFile file("../debug.keystore") storePassword 'android' keyAlias 'androiddebugkey' keyPassword 'android' } release { storeFile file("../ssm.keystore") storePassword 'SSMSample@123' keyAlias 'SSMSample' keyPassword 'SSMSample@123' } } buildTypes { debug { signingConfig signingConfigs.debug // Enables code shrinking, obfuscation, and optimization for only // your project's release build type. minifyEnabled false // Enables resource shrinking, which is performed by the // Android Gradle plugin. shrinkResources false } profile { signingConfig signingConfigs.debug minifyEnabled false shrinkResources false } release { signingConfig signingConfigs.release minifyEnabled true shrinkResources true } } -
Tiếp theo sẽ là việc tích hợp với project Firebase tạo từ trước.
- Với môi trường dev bây giờ bạn sẽ có ApplicationId: com.danhdue.stacked_state_mamagement.dev và SHA1 tương ứng với debug.keystore
- Sau khi tích hợp với Firebase Project bạn sẽ có file google-services.json
- Việc còn lại chỉ là thêm nó vào thư mục: android/app/src/debug
-
- Setup iOS Project
- Parse Properties
- Trong quá trinh build, Flutter DevTools sẽ tạo ra một cặp file :
- Generated.xcconfig
- flutter_export_environment.sh
- Hai files chưa thông tin về dart-defines được mã hoá dưới dạng base64.
-
Create SSM-defaults.xcconfig file with default values
DART_DEFINES_APP_NAME=SSM(Dev) DART_DEFINES_APP_SUFFIX= -
Add to the Debug and Release configurations
#include? "Pods/Target Support Files/Pods-Runner/Pods-Runner.release.xcconfig" #include "Generated.xcconfig" #include "SSM-defaults.xcconfig" #include "SSM.xcconfig" - Note :
- File SSM.xcconfig là file được sinh ra sau khi chúng ta thêm pre-actions cho build settings
- Xem xét việc đặt SSM.xcconfig sau SSM-default.xcconfig, như vậy các giá trị từ câu lệnh chạy Flutter có thể ghi đè được các giá trị mặc định.
- Thêm vào pre build action Mở iOS project bằng XCode. Chọn build schema => Edit Schema.
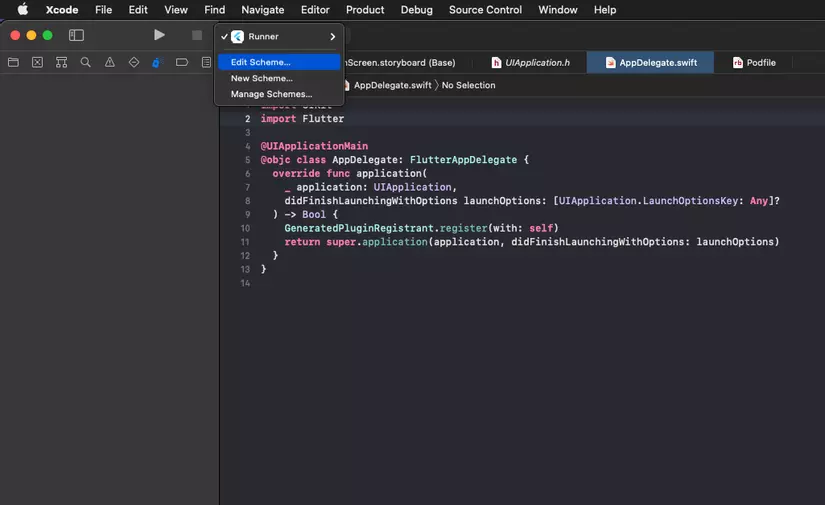
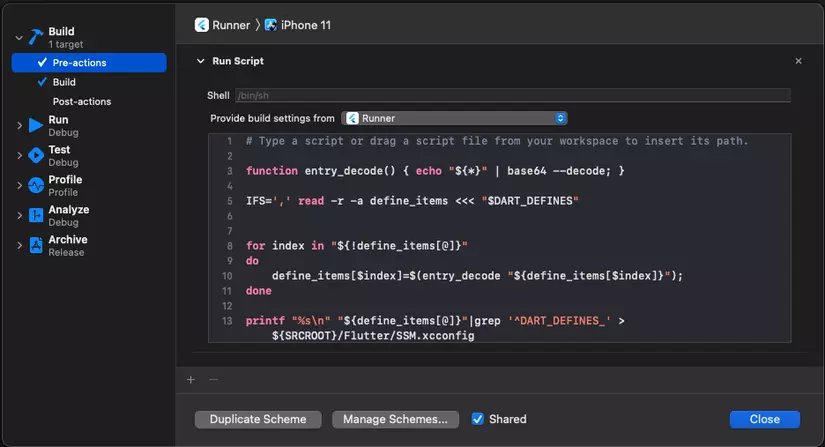
- Chọn Build => Pre-actions và thêm vào run script với nội dung bên dưới:
-
Nội dung của script :
# Type a script or drag a script file from your workspace to insert its path. function entry_decode() { echo "${*}" | base64 --decode; } IFS=',' read -r -a define_items <<< "$DART_DEFINES" for index in "${!define_items[@]}" do define_items[$index]=$(entry_decode "${define_items[$index]}"); done printf "%s\n" "${define_items[@]}"|grep '^DART_DEFINES_' > ${SRCROOT}/Flutter/SSM.xcconfig - Note : Các bạn có thể thay tên file *.xcconfig theo ý muốn của mình đồng thời phải chọn provide build settings from là project name của mình. Ở đây là Runner.
- Setup the Bundle Name and the Bundle Identifier : Chúng ta sẽ thiết lập Bundle Name và Bundle Identifier cho ứng dụng iOS bằng giá trị lấy được từ **dart-defines
-
Gán Bundle Name thành:
$(DART_DEFINES_APP_NAME)và Bundle Identifier thành :$(PRODUCT_BUNDLE_IDENTIFIER)$(DART_DEFINES_APP_SUFFIX)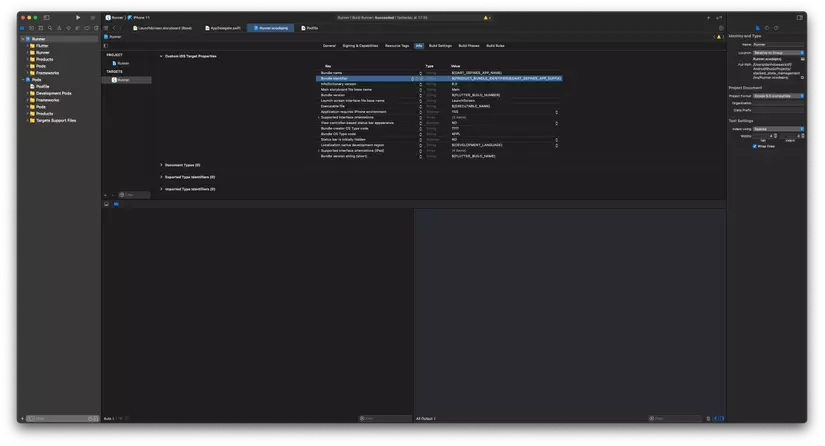
- Trong quá trinh build, Flutter DevTools sẽ tạo ra một cặp file :
- Setup build types :
-
Trong phần thiết lập Build Settings tìm Product bundle identifier và sửa bundle ids theo các build type giống như bên dưới:
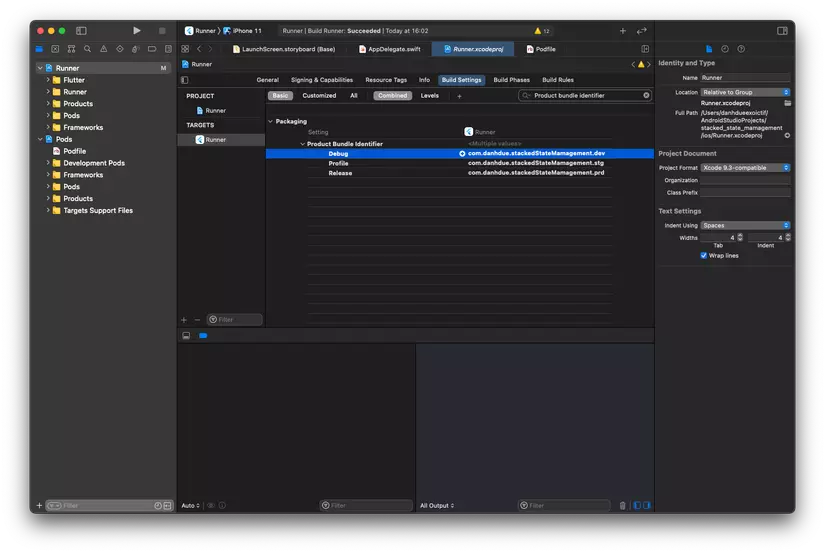
- Thêm vào bundle id mặc định các hậu tố: .dev cho môi trường Debug, .stg cho môi trường Staging và .prd cho môi trường Production.
-
Tiếp theo là chỉnh sửa build types trong Podfile như sau:
# Uncomment this line to define a global platform for your project platform :ios, '10.0' # CocoaPods analytics sends network stats synchronously affecting flutter build latency. ENV['COCOAPODS_DISABLE_STATS'] = 'true' project 'Runner', { 'Debug' => :debug, 'Profile' => :debug, 'Release' => :release, } ... -
Đồng bộ IPHONEOS_DEPLOYMENT_TARGET như sau:
post_install do |installer| installer.pods_project.targets.each do |target| target.build_configurations.each do |config| config.build_settings['IPHONEOS_DEPLOYMENT_TARGET'] = '10.0' end flutter_additional_ios_build_settings(target) end end -
Đầu tiên chúng ta cần tích hợp iOS App vào các Firebase Projects tương ứng với các môi trường đồng thời tải về các file GoogleService-Info.plist. Sau đó thêm hậu tố vào các file này tương ứng với các môi trường.

- Tạo thư mục Firebase theo đường dẫn ios/Runner/Firebase và copy/paste các plist files đã tải + đổi tên trên vào.
- Tiếp theo, chúng ta sẽ phải định nghĩa một biến môi trường trong XCode cái giữ tên file GoogleService-Info.plist cho từng môi trường là GOOGLE_SERVICE_INFO_PLIST_NAME.
- Trong Build Settings nhấn add new conditional or user-defined build setting rồi chọn Add User-Defined Setting
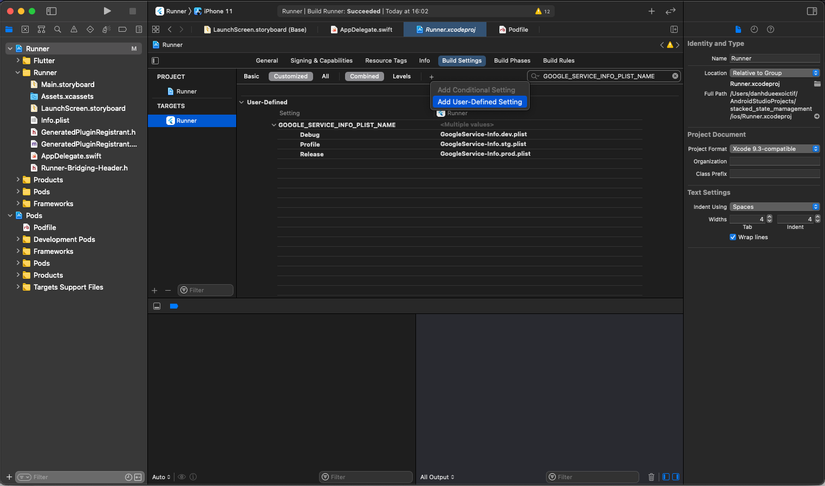
- Thêm vào biến GOOGLE_SERVICE_INFO_PLIST_NAME với các giá trị:
- GoogleService-Info.dev.plist cho Debug build type tương ứng với môi trường Develop.
- GoogleService-Info.stg.plist cho Profile build type tương ứng với môi trường Staging.
- GoogleService-Info.prod.plist cho Release build type tương ứng với môi trường Production.
-
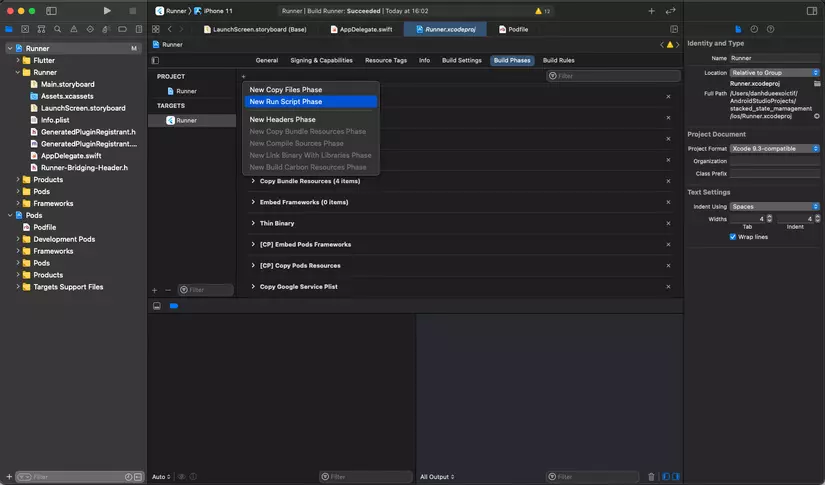
Cuối cùng là thêm vào script để copy và đổi lại tên các files GoogleService-Info.plist vào thư mục build của ứng dụng. Trong Build Phases click vào add a new build phase và chọn New Run Script Phase
-
Double click vào nó và đổi tên thành Copy Google Service Plist rồi thêm toàn bộ đoạn mã sau vào phần script:
# Type a script or drag a script file from your workspace to insert its path.
GOOGLE_SERVICE_INFO_PLIST_FROM="${PROJECT_DIR}/Runner/Firebase/${GOOGLE_SERVICE_INFO_PLIST_NAME}"

BUILD_APP_DIR="${BUILT_PRODUCTS_DIR}/${FULL_PRODUCT_NAME}"

GOOGLE_SERVICE_INFO_PLIST_TO="${BUILD_APP_DIR}/GoogleService-Info.plist"

cp "${GOOGLE_SERVICE_INFO_PLIST_FROM}" "${GOOGLE_SERVICE_INFO_PLIST_TO}"
-
- Parse Properties
-
Create build configurations for each environments
-
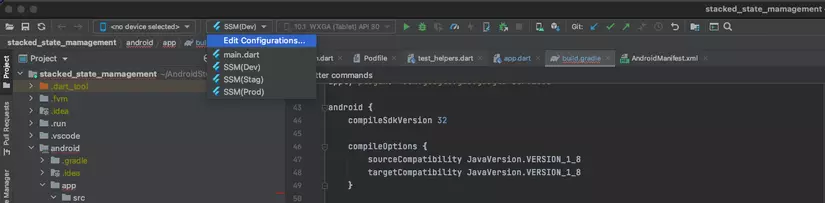
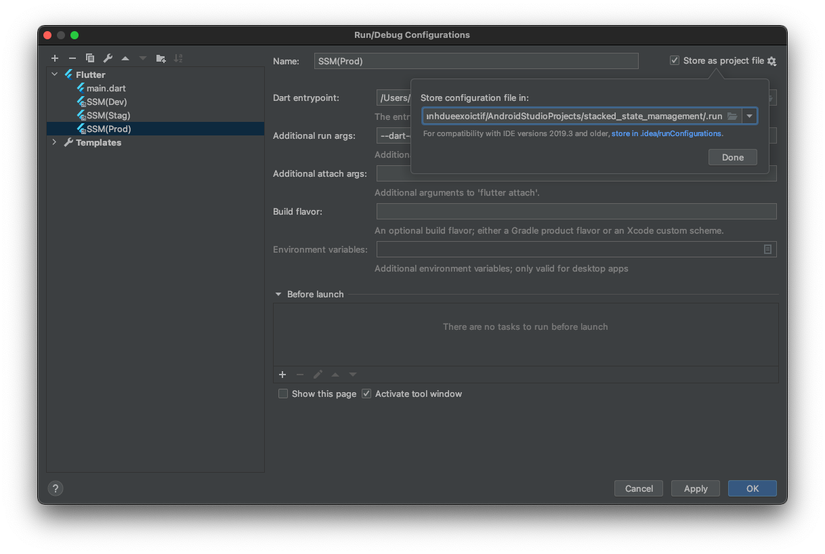
Đối với Android Studio bạn bấm vào Edit Configurations trên thanh toolbar:
-
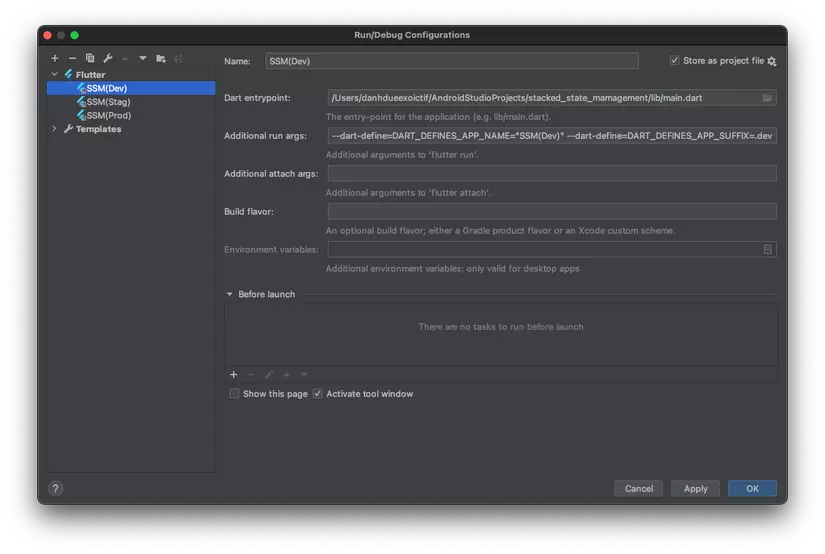
Rồi đặt tên cũng như thêm vào Additional run args như bên dưới:
-
Lúc này build name và additional run args tương ứng cho các môi trường sẽ là :
-
Develop: SSM(Dev) và –dart-define=DART_DEFINES_APP_NAME=”SSM(Dev)” –dart-define=DART_DEFINES_APP_SUFFIX=.dev –dart-define=DART_DEFINES_BASE_URL=”https://dev.danhdue.com/“
-
Staging: SSM(Stag) và –dart-define=DART_DEFINES_APP_NAME=”SSM(Stg)” –dart-define=DART_DEFINES_APP_SUFFIX=.stg –dart-define=DART_DEFINES_BASE_URL=”https://stg.danhdue.com/” –profile
-
Production: SSM(Prod) và –dart-define=DART_DEFINES_APP_NAME=”SSM” –dart-define=DART_DEFINES_BASE_URL=”https://danhdue.com/” –release
-
-
Để share các cấu hình này cho các thành viên trong nhóm bạn chỉ cần tick vào Store as project file => Điều này sẽ sinh ra một thư mục .run trong project của chúng ta. Đẩy lên git và tất cả các thành viên trong team sẽ có chung các build configurations này.
-
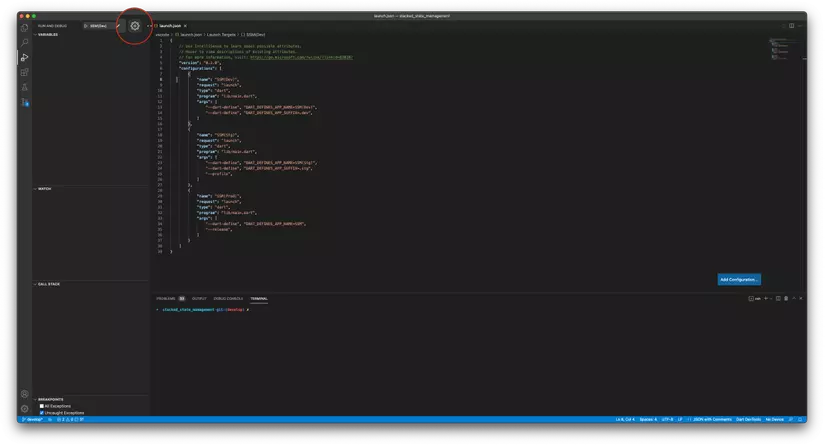
Đối với VSCode: Nếu bạn mở project bằng VSCode, ở toolbar phía bên trái, chọn mục build/run và thêm vào cấu hình bằng cách bấm vào biết tượng settings:
-
Khi đó một file launch.json sẽ được sinh ra trong thư mục .vscode. Việc cấu hình là cũng khá giống cho Android:
{ "version": "0.2.0", "configurations": [ { "name": "SSM(Dev)", "request": "launch", "type": "dart", "program": "lib/main.dart", "args": [ "--dart-define", "DART_DEFINES_APP_NAME=SSM(Dev)", "--dart-define", "DART_DEFINES_APP_SUFFIX=.dev", "--dart-define", "DART_DEFINES_BASE_URL=https://dev.danhdue.com/", ] }, { "name": "SSM(Stg)", "request": "launch", "type": "dart", "program": "lib/main.dart", "args": [ "--dart-define", "DART_DEFINES_APP_NAME=SSM(Stg)", "--dart-define", "DART_DEFINES_APP_SUFFIX=.stg", "--dart-define", "DART_DEFINES_BASE_URL=https://stg.danhdue.com/", "--profile", ] }, { "name": "SSM(Prod)", "request": "launch", "type": "dart", "program": "lib/main.dart", "args": [ "--dart-define", "DART_DEFINES_APP_NAME=SSM", "--dart-define", "DART_DEFINES_BASE_URL=https://danhdue.com/", "--release", ] } ] } - Upload thư mục này lên repo chung của dự án là các thành viên trong team sử dụng VSCode của bạn cũng có thể sử dụng được cấu hình build tương ứng này.
- Đến đây, chúng ta đã hoàn thành việc cấu hình môi trường cho một dự án Flutter. Click chọn bản build trên Android Studio/VSCode chọn run và tận hưởng thành quả.
-